
We are excited to annouce our NEW Vehicle Wiring & Compatibility Database:
You will find TONS of vehicle specific information and part recommendations, hand picked by our engineers for your specific vehicle! We have verified everything based on vehicle specifics so this is not a general compatibility list!
Please provide information about your vehicle:
Backup Camera Harness Reverse Trigger Wire Instructions
The Reverse Trigger Wire is sold with the following product:
Backup Camera Adapter Harness (Fits: Toyota/Subaru/Scion)
.jpg)
Price: $30
CLICK HERE FOR MORE INFO
This page will answer the following questions:
- Why do I need the reverse trigger wire installed?
- Does my vehicle have the reverse trigger wire installed from the factory?
- I have verified that my vehicle does not have the trigger wire installed. How do I install the reverse trigger wire?
Why do I need the reverse trigger wire installed?
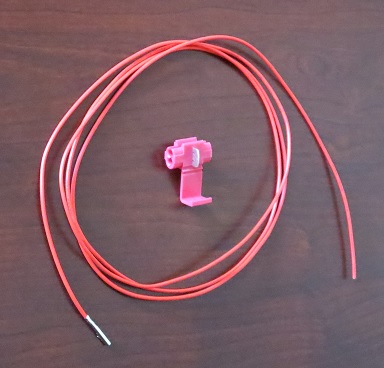
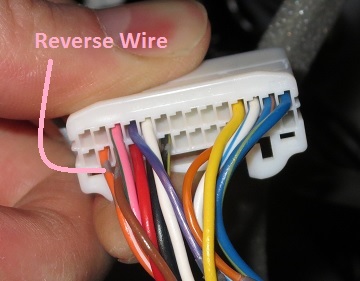
The wire provided with the kit sold here is approximatly 4 feet long. If a vehicle has a factory installed backup camera, it will have this wire installed as shown below. The wire will provide a signal to the vehicle's head unit when the vehicle is in reverse. This will trigger the video screen to show the video from the backup camera on the screen and will energize the backup camera. If the wire is not installed, the camera will not be provided power when the car is shifted into reverse and the backup camera will not work.
Does my vehicle have the reverse trigger wire installed from the factory?
This is an imortant question. Most vehicles are provided from the factory with the reverse trigger wire pre-installed. Use one of these methods to determine if your vehicle already has the wire. This will save you the time required to install the reverse trigger and will also save you money.(The kit that does not include the reverse trigger wire is $2 cheaper)
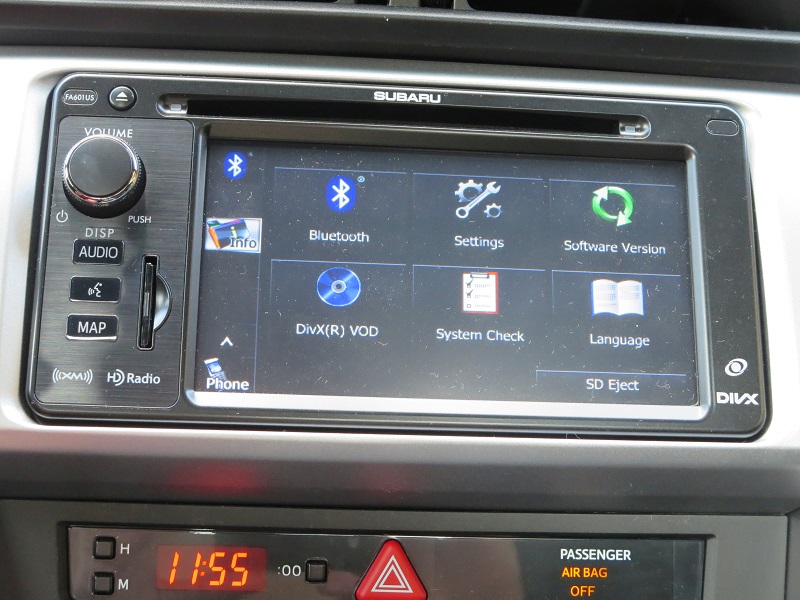
Method 1: Verify that the indication changes on the vehicle's touchscreen.
This method is the simplest. Most head units display the state of the reverse signal on one of the system information screens. Here's how we found the screen on our Subaru BRZ(The Subaru BRZ has the trigger wire installed from the factory). This will be different on other vehicles. The process is the same, but menus and options will be different:
1) Turn the vehicle's ignition ON(Start the engine. ACC mode does not always work). Engage the parking brake.
2)
Place the system in "Audio" mode.(i.e. exit all navigation screens and transition to the audio selection screen)
3) Select the "Info" tab.
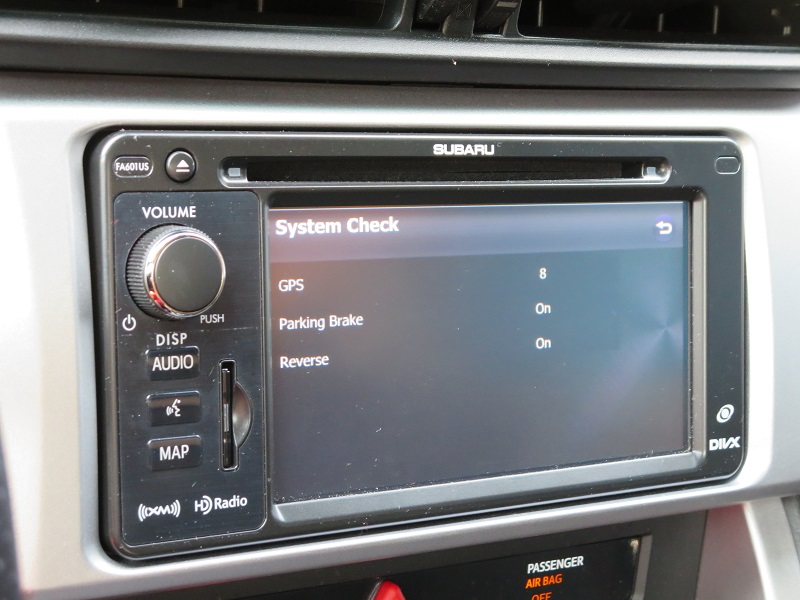
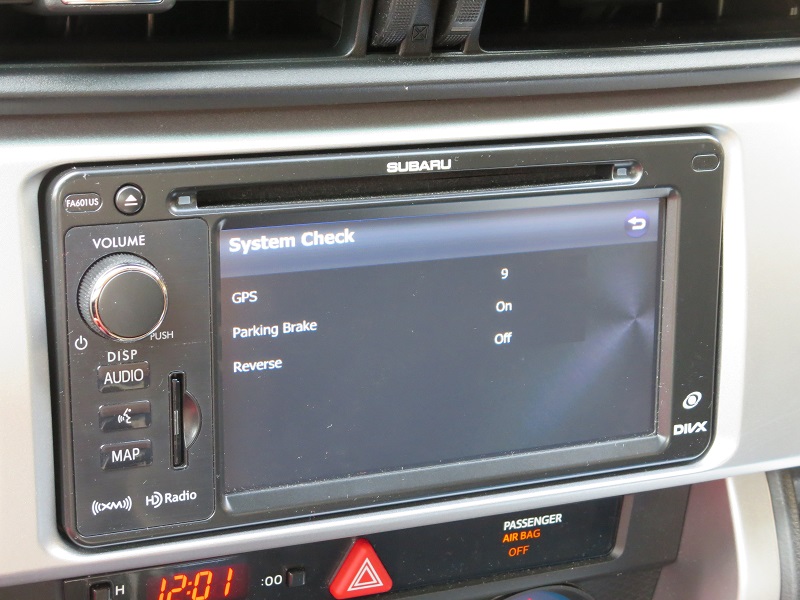
5) Shift the car out of reverse.
6) Exit the "System Check" screen
7) Turn the vehicle's ignition OFF
Method 2: Check the back of the headunit to see if the wire is installed.
This method is requires unbolting the headunit. This process is much easier on some vehicles than others.
1) Verify that the vehicle is off
2) Carefully remove the plastic cover around the head unit and unscrew/unbolt as appropriate
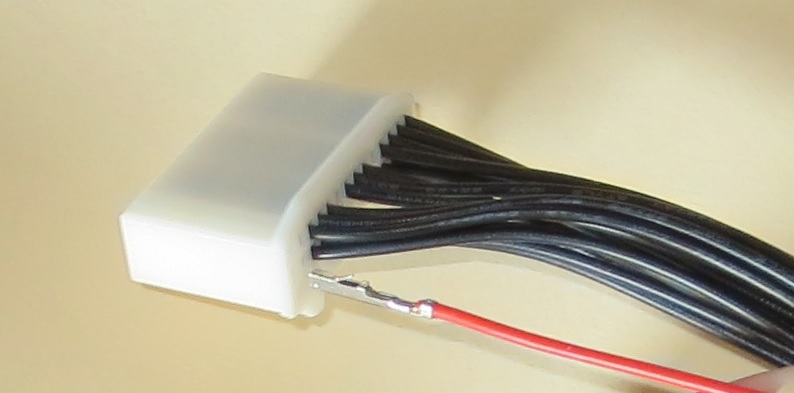
3) Slide the unit out and Unplug the 28-pin from the back of the OEM head unit. The connector looks like this:
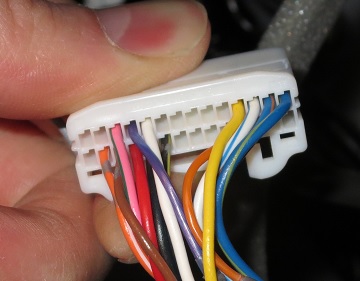
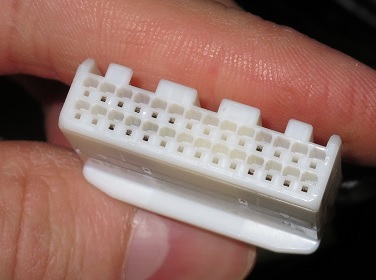
This picture is from our Subaru BRZ.
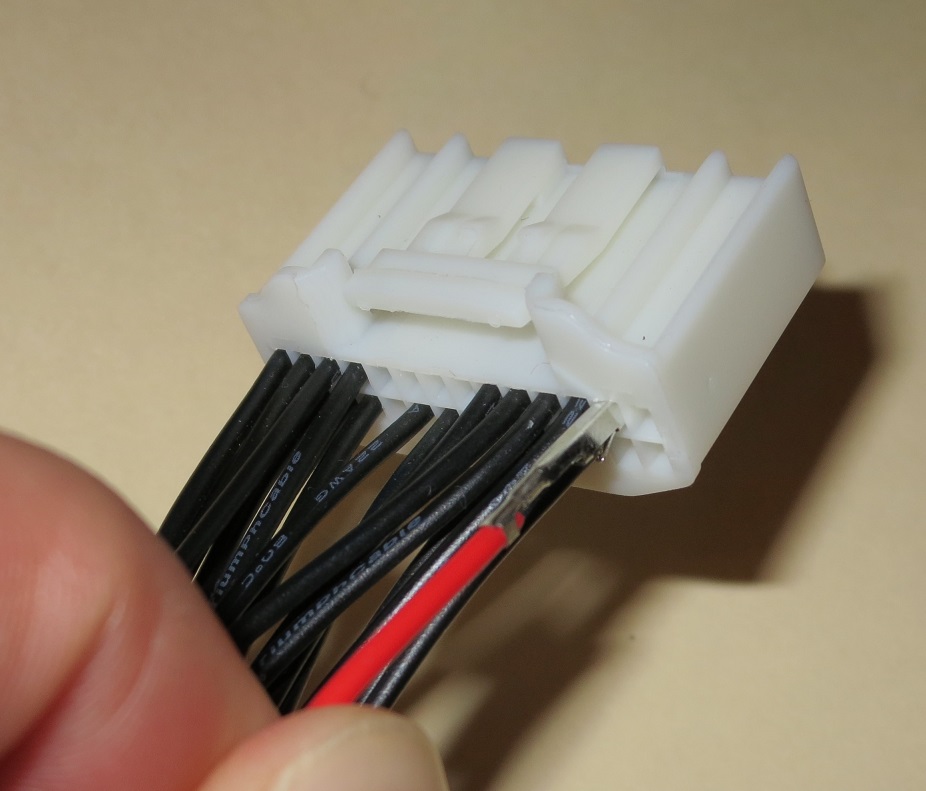
4) The reverse trigger wire is installed in pin 2 of this connector. See the pictures below. Compare them to the connector on your vehicle. If the reverse trigger wire is intalled in your connector, you will not need to install the wire yourself.
The picture on the right is from our Subaru BRZ. Note that pin 2 has an orange wire with silver bands inserted into the back of the connector. This is the reverse trigger wire.
5) Reconnect the 28-pin connector to the back of the head unit.
6) Slide the head unit back into position. Bolt it back into place. Re-insert any platic trim pieces that were previously removed.Method 3: Check our list.
THIS IS NOT A COMPLETE LIST. Some models may also have different configurations depending on the factory installed features or model year of the vehicle. If your vehicle is not on this list or if you find that this information is incorrect, please email us(inquiry@autoharnesshouse.com) and we will update the site accordingly.
Models that DO NOT have the Reverse Trigger wire installed from the factory:
-2012-2014 Toyota Yaris (The Yaris Hybrid may be an exception to this)
-2012-2013 Toyota Tacoma
-2013-2015 Scion FRS
-2012-2013 Scion xB
-2012-2014 Scion xD
-2012-2013 Scion tC
-2012-2015 Scion iQ
Models that DO have the Reverse Trigger Wire pre-installed from the factory:
-2013-2015 Subaru BRZ
-2013-2016 Toyota Avalon
-2012-2016 Toyota Camry
-2014-2015 Toyota Tacoma
-2014-2015 Scion tC
-2014-2015 Scion xB
I have verified that my vehicle does not have the trigger wire installed. How do I install the reverse trigger wire?
The wire provided with the kit sold here is approximatly 4 feet long. One end of the wire will connect to the 28-pin connector on the back of your vehicle's head unit. The other will connect to a source wire that will energized in reverse. We will discuss both of these connections below.
Connection of the reverse wire to the 28-pin connector:
The reverse trigger wire, provided with the backup camera harness, Has a pin on one end that will slide into the 28-pin connector. Insert this pin as follows:
1) Verify that the vehicle is off
2) Carefully remove the plastic cover around the head unit and unscrew/unbolt as appropriate
3) Slide the unit out and Unplug the 28-pin from the back of the OEM head unit. The connector looks like this:
This picture is from our Subaru BRZ.
4) Insert the pin on the included wire into the vehicle's 28-pin connector. The reverse trigger wire is installed in pin 2 of this connector. See the pictures below. The pin will slide into the back of the connector and snap into place. If you install this pin in the wrong location, it will not be easy to remove it from the connector for reinstallation. If you do this, please contact support at inquiry@autoharnesshouse.com.
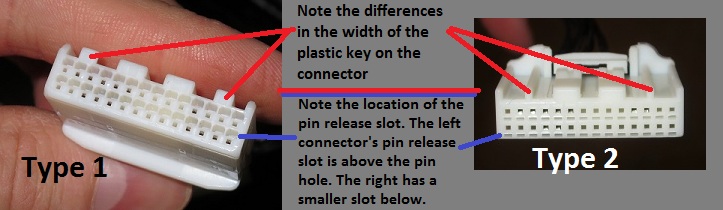
Identify which type of 28-pin connector you have :
The AutoHarnessHouse r everse trigger wires are shipped with 2 different pin types (one crimped to each end). You will only use one of these pins. The other should be cut off and discarded once the pin you are using is installed correctly. Identify which connector type you have based on this figure:
Pin Type 1 installation instructions:
The Type 1 pin has a slot in the bottom. The tab on the top is aligned along 1 side such that it fits into the slot in the back of the connector as shown in this figure:
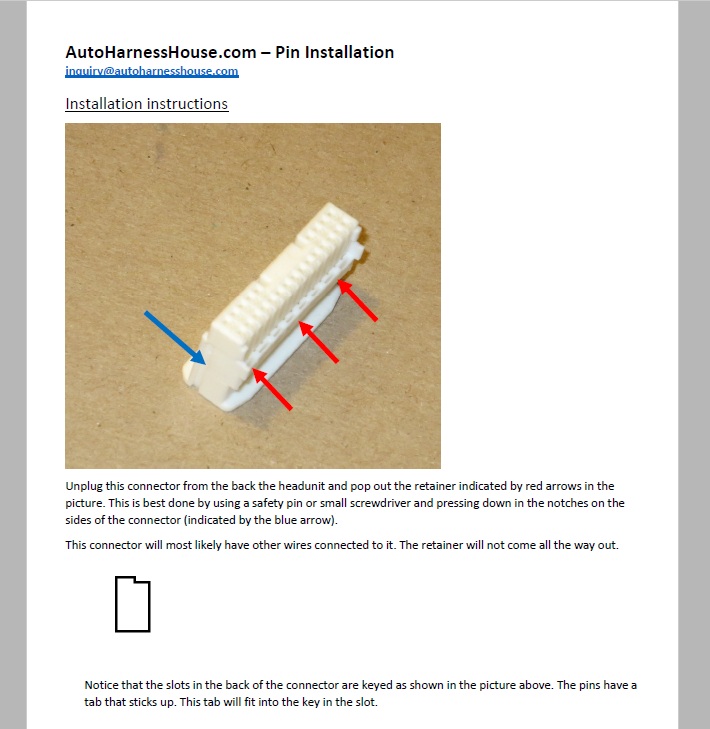
Once the pin is inserted, the retainer should be snapped into place.
Pin Type 2 installation instructions:
The Type 2 pin will have a metal tab as shown in this picture:
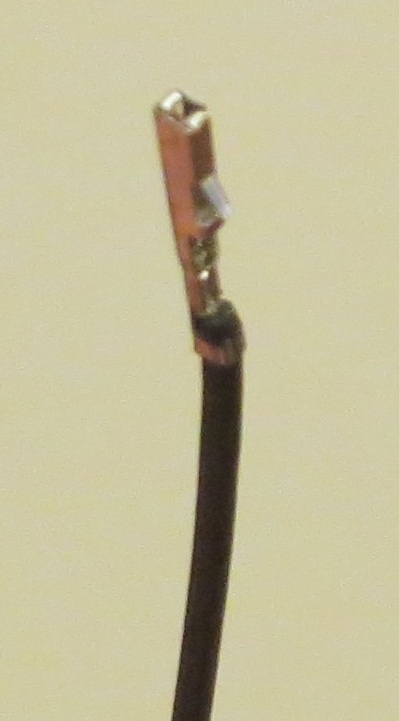
The pin must be oriented correctly to snap into place. Note the orientation of the metal tab on the top of the pin in relation to the orientation of the 28-pin connector:
Once the pin is inserted:
5) Reconnect the 28-pin connector to the back of the head unit.
6) Slide the head unit back into position. Bolt it back into place. Re-insert any platic trim pieces that were previously removed.
Connection of the reverse signal to the reverse trigger wire:
The reverse trigger wire is providing a signal to your head unit to indicate that the vehicle has been shifted into reverse. In the previous section, we made this connection to the back of the vehicle's head unit. We must now connect the wire to the proper signal on the vehicle's wiring harness. The provided wire is long enough to reach the signal in the driver's side kick panel.
This process will vary some depending on the vehicle. An alternate method of installation is to connect this wire to the backup light power wire. This requires running an additional wire to the back of the car. If you are uncomfortable performing the procedure discussed below or if your car's wiring differs from the connections shown, extend the wire and connect it to the backup light.
Here is how we performed the kick-panel wire tap on a Scion FRS:
Warning: It is your responsibility to make sure that you do not damage the vehicle or any components while performing the steps below. The process below should only be performed by someone who is comfortable performing such a modification.
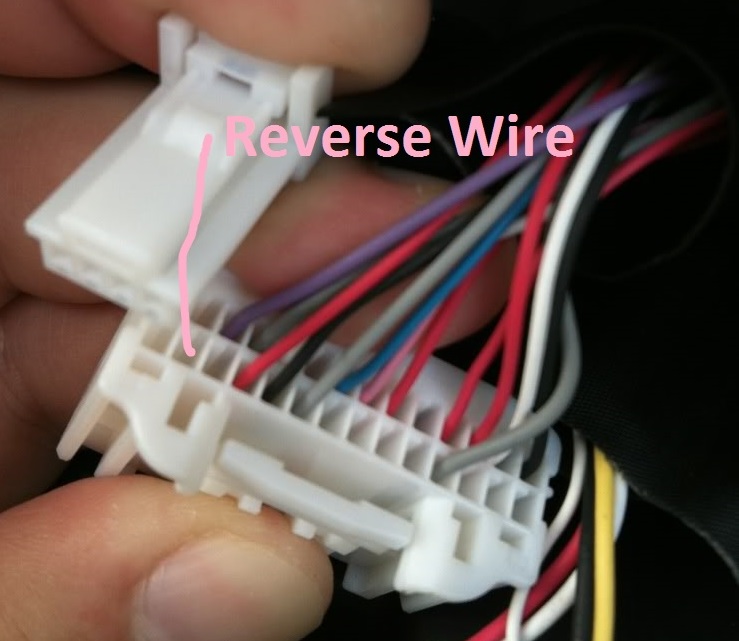
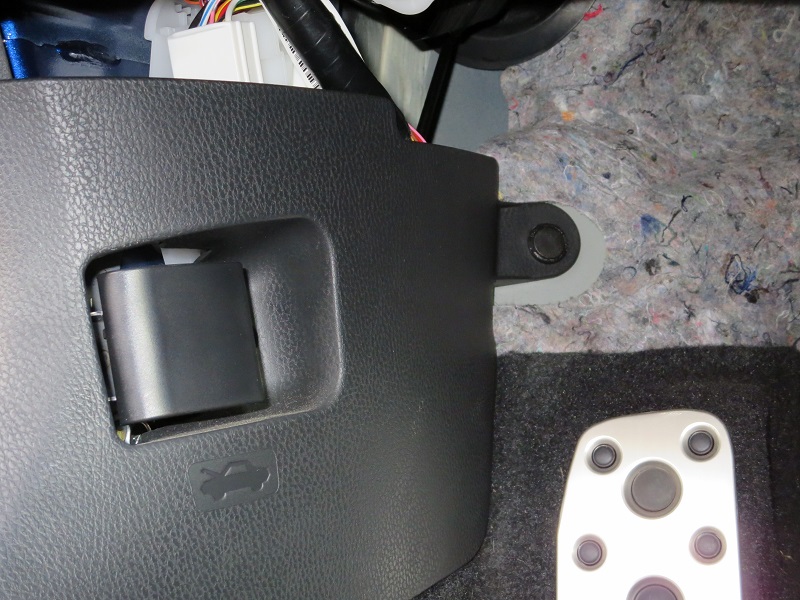
1) Remove the panel in the passenger side floorpan that covers the trunk release. In this case, there is a push-pin clip that you can see in the picture below that should be removed first. The panel can then be gently slid towards the back of the car to disconnect the panel from the 2 Trim panel retainer clips that are fitted behind it. The panel is also clipped in with the door-sill panel. to remove the panel entirely, gently pru up the door-sill panel and slide the panel out.
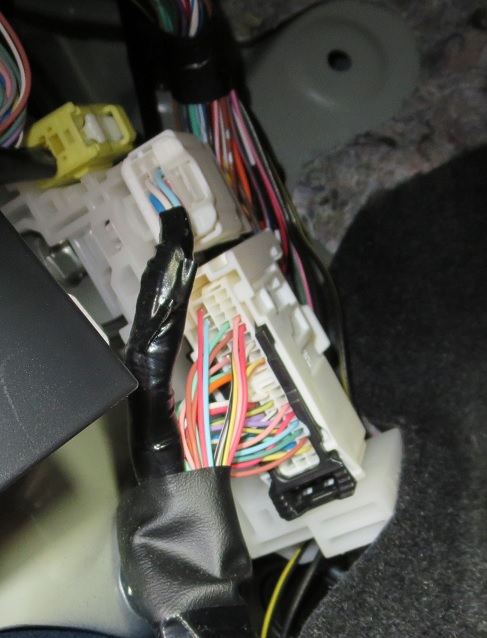
2) Find the pink wire that corresponds to the reverse lights. This wire connects to the pin 5 (5th pin down from the top. far left side).
3) Engage the parking brake
4) Put the car in "RUN" but do not start the engine. Shift the car into reverse. Verify that the backup lights come on.
5) Test the wire with a multimeter to verify that it is providing about 12 Volts. Alternatively, you can use a 12 Volt test light to perform this step.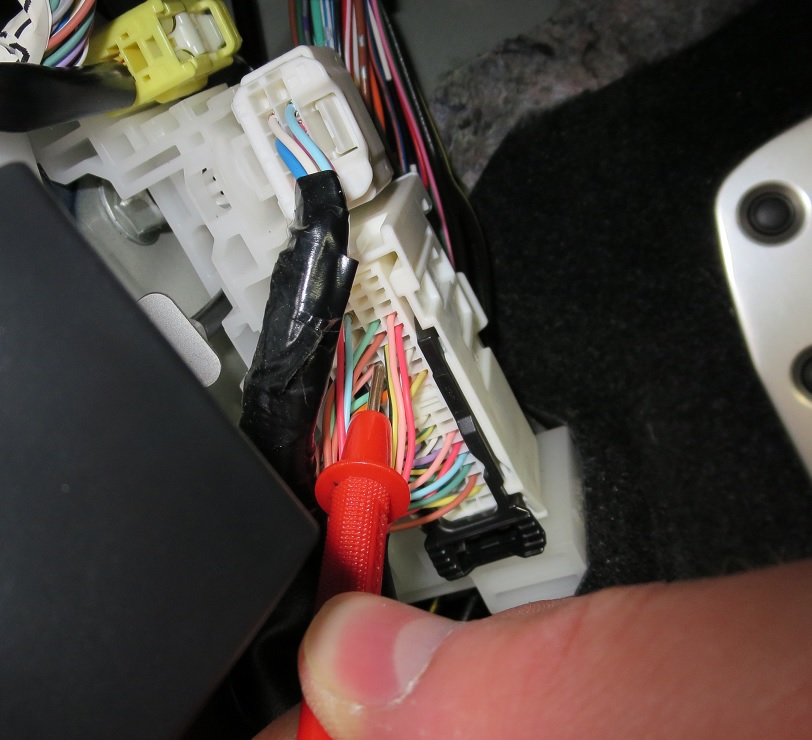
6) Shift the car back into Park or Neutral and verify that the wire is no longer supplying 12 Volts.
7) Turn the car off.
8) Route the reverse trigger wire from behind the head unit down to the driver's side kick panel.
9) Use the quick-tap connector provided in the kit to tap into the pink wire. Make sure that the metal tab on the quick-tap connector is pinched all the way down. Use pliers if necessary to pinch it into place.
10) Reconnect all panels.
www.autoharnesshouse.com
inquiry@autoharnesshouse.com